Rescue Sticky Pizza Dough in 15–30 Minutes Without Adding Flour
Stop adding flour. Use wet hands, a bench scraper, and a 15–30 minute chill to rescue sticky pizza dough, plus simple recipe changes to prevent it next time.
Don’t add flour. Wet your hands or coat them lightly in olive oil, switch to a bench scraper for any lifting or folding, and chill the dough for 15 to 30 minutes if it’s still glued to everything. Those three moves rescue most sticky pizza dough without changing its texture. Before you touch it again, ask yourself one question: was it sticky right out of the mixer, after proofing, or only after it sat in the fridge? That answer decides which fix you actually need.
TL;DR:
- Most sticky dough issues result from high hydration, insufficient gluten development, or excess warmth, each requiring specific troubleshooting steps.
- Handling sticky dough effectively involves using wet or oiled hands, a bench scraper, and resting or chilling the dough without adding extra flour.
- Condensation from covering warm dough before refrigeration can cause surface stickiness, which is fixable by allowing airflow or briefly cooling the dough.
- Adjust hydration levels by reducing water content or using higher-protein flour for better absorption and handling in future batches.
- Using semolina on the peel enhances dough release and prevents sticking during the transfer to the oven.
Table of Contents
- How to Quickly Diagnose Why Your Dough Is Sticky
- Immediate, No-Recipe-Change Fixes You Can Do Right Now
- Cause-Based Fixes and What to Change Next Time
- Shaping, Peel, and Launch Without Adding Flour
- Recipe and Routine Changes to Avoid Sticky Dough Next Time
- Why the Fixes Work: The Science Behind Sticky Dough
- What to Prioritize When Rescuing Sticky Dough
- Skip the Guesswork With Ready-Made Dough Balls
- Sources
- FAQ
How to Quickly Diagnose Why Your Dough Is Sticky
Sticky dough isn’t one problem. It’s usually one of three: too much water for the flour’s protein capacity, gluten that hasn’t developed enough structure to trap that water, or dough that’s simply too warm and has gone slack. Fond’s troubleshooting guide points to these same three culprits, and figuring out which one you’re dealing with takes about 30 seconds of poking at the dough.
Start with the timeline. If it was sticky the moment you finished mixing, that’s almost always hydration or an under-mixed dough. If it turned sticky after bulk proof or overnight in the fridge, temperature or overproofing is more likely the cause.
Run these quick checks:
- Windowpane test: stretch a golf-ball piece of dough thin. If it tears jagged and short, gluten isn’t developed yet. If it stretches into a thin, translucent sheet, structure is fine.
- Smell test: a sharp, alcohol-like or beery smell signals overproofing, not a hydration problem.
- Touch test: dough that feels slack, warm, and almost liquid at the edges has likely overproofed or gotten too warm during a long rise.
- Surface test: a wet, slick film that appeared only after chilling (not during mixing) often points to condensation from how the dough was covered, not the recipe itself.
Once you know which of these you’re facing, the fix takes minutes, not a do-over.
Immediate, No-Recipe-Change Fixes You Can Do Right Now
None of these require rebuilding your recipe. They just buy your dough back from the sticky pile on the counter.
- Wet or oil your hands instead of flouring them. Dip your fingers in water or a thin coat of olive oil before handling. It stops dough from sticking to your skin without pulling extra flour into the mix, which toughens the finished crust.
- Switch to a bench scraper. Use it to lift, fold, and turn the dough instead of your hands. A metal scraper glides under sticky dough cleanly and does the job flour was doing badly.
- Rest it for 15 to 20 minutes. If the dough just came together and feels wet and shaggy, this is often not a hydration mistake at all. Flour hasn’t finished absorbing water yet, and a short rest, sometimes called autolyse, resolves the tackiness on its own.
- Chill it for 15 to 30 minutes. Cold firms up the gluten network and slows things down enough to shape. Don’t skip the next step, though.
- Let chilled dough sit at room temperature for a few minutes before shaping. Dough straight from the fridge resists stretching and can tear, which reads as “stickiness” when it’s really stiffness.
- Do two or three stretch-and-folds. Grab an edge, stretch it over the center, rotate, repeat. This builds gluten strength fast, often faster than kneading, and firms up a slack dough within minutes.
Pro Tip: Keep a small bowl of water next to your workstation instead of a pile of flour. Every time you’d normally reach for flour, dip your fingers instead. Your dough hydration stays exactly where the recipe intended.
None of this is about masking a bad dough. It’s about handling the dough you already have correctly, so the crust bakes the way it was designed to.
Cause-Based Fixes and What to Change Next Time
Once you’ve diagnosed the cause, the fix splits into two parts: what to do right now, and what to change in your next batch so you’re not back here tomorrow.
Hydration too high. If your dough tests out wet at every stage, chances are the water percentage is just too aggressive for the flour you’re using. Doughs at 68 to 70% hydration or higher are noticeably tackier and demand more advanced handling than a standard home setup usually has patience for.
- Right now: chill the dough, use the bench scraper, and rest between folds. Don’t try to shape it warm.
- Next batch: cut water back by 2 to 4% or switch to a higher-protein flour that can absorb and hold more liquid. Many home cooks get better, more consistent results starting around moderate hydration percentages rather than chasing the wetter, more advanced end of the range.
Under-developed gluten. This shows up as dough that’s sticky, slack, and tears instead of stretching.
- Right now: do three or four rounds of stretch-and-folds, spaced 10 minutes apart, rather than one long knead.
- Next batch: build in an autolyse, mixing just flour and water and letting it rest 20 to 30 minutes before adding yeast and salt. It jump-starts gluten formation before you’ve even started kneading.
Dough that’s too warm. Warm dough turns slack and sticky because heat weakens the gluten bonds holding the water in place.
- Right now: get it into the fridge immediately, even for just 15 minutes, to firm the structure back up.
- Next batch: target a finished dough temperature in the mid to high 70s Fahrenheit rather than letting it sit in a warm kitchen for hours. Track it with a cheap probe thermometer if your kitchen runs hot in summer.
Overproofed dough. If it smells sharp or alcoholic and feels almost liquid at the edges, it’s gone past its peak. You can’t fully reverse this, but you don’t have to throw it out.
- Right now: press it straight into an oiled sheet pan or tray and bake it as a pan pizza. The higher-sided pan holds the loose structure together in a way a thin-crust stretch never could.
- Next batch: cut the yeast slightly or shorten the fridge fermentation window. A dough that goes from cold ferment straight to a hot kitchen counter for hours is the classic setup for overproofing before you even realize it.
Across nearly every case, the instinct to dump in more flour is the wrong move. It doesn’t fix the underlying cause, and it changes the bake in ways that show up later as a dense, chewy crust instead of the open, airy structure you were after.
Shaping, Peel, and Launch Without Adding Flour
Getting sticky dough onto the peel and off it cleanly is its own separate skill, and it’s where a lot of otherwise-good dough ends up as a puddle on the oven floor.
Semolina beats flour on the peel. Coarse semolina acts almost like tiny ball bearings under the dough, letting it slide rather than grip. Plain flour clumps and burns faster; semolina holds up under high heat and gives you a longer window before the dough sticks again.
- Semolina: the standard choice for wood-fired or high-heat ovens. Coarse texture, doesn’t burn as fast as flour.
- Rice flour: works well if you want a finer dust that won’t leave a gritty texture on the crust bottom.
- A thin oil coat: fine for pan pizza or lower-heat setups, but skip it for anything going onto a very hot stone.
- Parchment: the safest fallback for beginners or very wet dough, though you’ll lose some of the direct stone contact that crisps the bottom.
Before launching, run the jiggle test: give the peel a short, sharp shake. If the pizza slides freely, you’re clear to launch. If it resists, don’t force it, lift the stuck edge gently and dust a little semolina underneath before trying again.
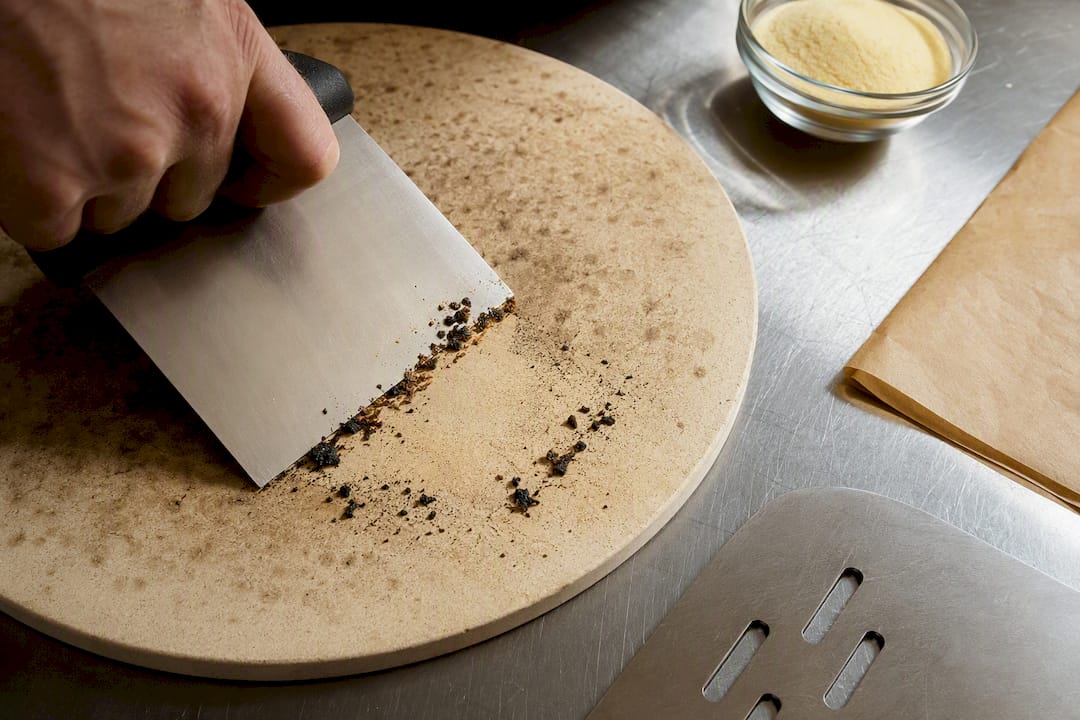
Keep your stone or steel preheated properly and wipe off any burnt flour or semolina buildup between bakes; leftover debris on a hot stone is a common, overlooked cause of spot-sticking that has nothing to do with your dough at all. A few tools earn permanent counter space for this: a bench scraper, a metal peel, a bag of semolina, and parchment for backup.
Recipe and Routine Changes to Avoid Sticky Dough Next Time
Fixing tonight’s dough is one problem. Not repeating it next weekend is the more useful goal.
- Set a hydration baseline around 60 to 63% if you’re a home cook without a lot of high-hydration experience. It’s forgiving, shapes easily, and still produces a good open crumb.
- Hold back about 10% of the water whenever you’re testing a new recipe for the first time. It’s easier to add a splash of water to a stiff dough than to rescue one that’s already too wet.
- Choose bread flour or a high-protein Italian 00 flour if you want to push hydration higher later. More protein means more gluten capacity to hold onto that extra water.
- Build in an autolyse. Mixing flour and water first and letting it rest 20 to 30 minutes before adding yeast and salt gives you a head start on gluten development and an easier windowpane test later.
- Tune your cold fermentation window. A 24 to 72 hour fridge ferment develops flavor and improves handling, but longer isn’t automatically better. If your dough keeps overproofing, shorten the window or cut back the yeast slightly.
- Store flour airtight, especially in humid climates. Flour pulls moisture from the air over time, which quietly shifts your hydration percentage without you changing a thing in the recipe.
Small adjustments compound. A dough that’s 3% too wet and slightly under-fermented doesn’t just have one problem, it has two stacking on top of each other, which is why the same “sticky dough” complaint can feel different every time.
Why the Fixes Work: The Science Behind Sticky Dough
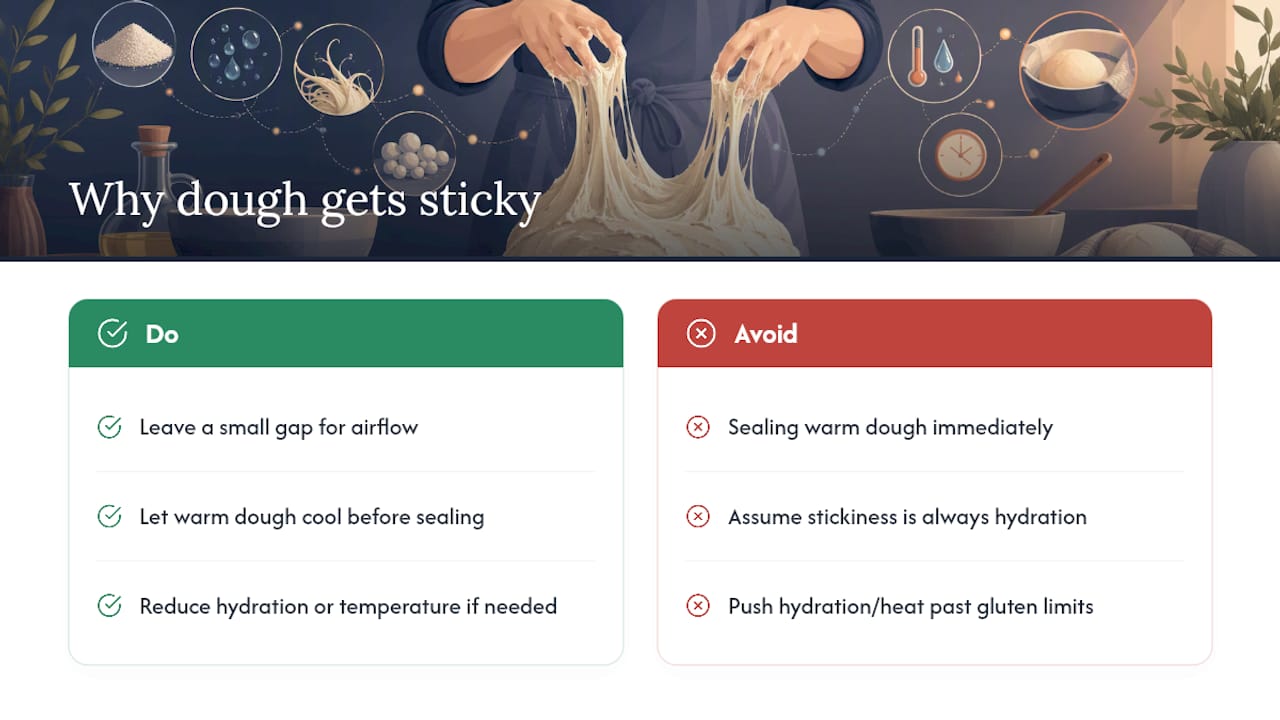
Stickiness isn’t random. Gluten is a stretchy protein network, and it can only hold so much water before the dough starts behaving more like batter than dough. Push hydration or temperature past what that network can manage, and the surface turns tacky no matter how careful your technique is.
There’s a cause that catches a lot of home cooks off guard, though, and it has nothing to do with the recipe at all.
When warm dough gets covered and placed in the fridge, condensation can form inside the container as it cools. That moisture drips back onto the dough surface, creating a wet, sticky layer that looks like a hydration mistake but is really just trapped water vapor.
That explanation, credited to dough consultant Tom Lehmann in Pizza Today’s troubleshooting guide, accounts for a surprising number of “why is my dough suddenly sticky” moments. Leaving a small gap for airflow or letting the dough cool briefly before sealing the container solves it without touching the recipe. Combined with the hydration and gluten mechanics above, it covers nearly every sticky dough scenario a home kitchen produces.
What to Prioritize When Rescuing Sticky Dough
If I had to boil this down to one rule, it’s this: fix the handling before you touch the recipe. Most sticky dough problems are solved with a bench scraper, a short chill, and patience, not a flour adjustment. Reworking hydration should be a next-batch decision, made calmly, not a panic move mid-bake.
Know when to cut your losses, too. A truly overproofed dough with a sharp, boozy smell isn’t coming back to a stretchy, shapeable state. Press it into a pan and bake a thick-crust pizza instead of fighting it on a peel. My mantra in the kitchen: work the dough, don’t feed it flour.
— Michael
Skip the Guesswork With Ready-Made Dough Balls
If handling sticky dough feels like more troubleshooting than you signed up for on a Friday night, Doughdorks builds that consistency in before it ever reaches your kitchen. The 48-hour Neapolitan dough balls are made with Italian 00 flour, fresh yeast, and extra virgin olive oil, fermented on a schedule designed to avoid the overproofing and hydration mismatches covered above.

For a flavor twist without any extra handling risk, the Italian herb dough balls bring seasoning baked into the dough itself, and the sourdough pizza dough balls suit anyone chasing a more complex crust without managing a sourdough starter at home. If you’d rather stock up for a run of pizza nights, the full pizza dough ball collection ships across the UK, so a batch is ready in the fridge whenever the craving hits. Order a box and let the 48-hour ferment do the work your countertop just did the hard way.
Sources
- Pizza Dough Troubleshooting: Fix Every Problem | Fond
- Troubleshooting your pizza dough: a guide to making pizza better - Pizza Today
- Pizza Dough Sticking to Everything? Here’s Why and How to Fix It - That Pizza Kitchen
- Why Is My Pizza Dough So Sticky? (And What to Do) - Pizza Logic
FAQ
Can I Still Use Sticky Pizza Dough?
Yes. A slightly tacky dough is normal and still bakes fine; only convert it to a pan pizza if it’s overproofed, smells alcoholic, or feels slack and liquid at the edges.
How Do I Fix Extremely Sticky Dough?
Skip the flour and use wet or oiled hands with a bench scraper, then chill the dough for 15 to 30 minutes to firm the gluten before handling it again.
Why Is My Dough Still Sticky Even After Proofing?
It’s often condensation from covering warm dough before it cooled, or it’s simply under-hydrated gluten that never fully absorbed the water; a short rest or stretch-and-fold sequence usually clears it up.
Can You Fix Overproofed Pizza Dough?
Not entirely, but you can save it. Press it into an oiled sheet pan for a pan-style pizza instead of trying to stretch it thin, and cut back the yeast or fridge time next batch to avoid it happening again.
Recommended
- How to Fix an Undercooked Pizza Base: Rescue It Now
- How to Stretch Pizza Dough Without Tearing
- Can Pizza Dough Be Frozen? Yes - Here’s How
- Pizza Dough for Ooni Ovens
READY-MADE • FROZEN • UK DELIVERY
Skip the mixing. Keep proper dough in your freezer.
48-hour fermented, individually proofed in their own pot and delivered frozen across the UK. Defrost, stretch, top and bake.
-
 48-Hour Neapolitan-Style Pizza Dough Balls – Box of 12
£22.88
-
 48-Hour Neapolitan-Style Pizza Dough Balls – Box of 20
£32.30
-
 48-Hour Neapolitan-Style Pizza Dough Balls – Box of 8
£18
Handmade in Dorset • Free UK delivery over £50 • Free proofing pot with every dough ball